Posting Great Pics -- Tutorial Part 1, Background and Setting
Posting Great Pics -- Tutorial Part 2, Lighting
Taking good pictures is only half the battle. It isn't often that you are going to snap a great shot that needs no editing at all. Photo Editing isn't cheating and it doesn't mean that you don't take good photos. It is just part of the process. You are trying to recreate how it looked through your eyes, or to create what you want your viewer to see. It's an enhanced experience, like HDTV is way better than... whatever it's called when it isn't HD.
Photo Editing is more than just cropping, resizing and adjusting the color of an image. You have the ability to create a mood with your photos, an atmosphere for your blog. Think about the atmosphere of dining at McDonalds verses a nice restaurant. Big difference, I know where I'd rather be spending time.
Most the photos on my blog have a feel like the one posted below. There are a couple of reasons for this. First, I like it. Second, I am trying to create something that actually looks good given the blog template I am using. Notice that nice white border around my photos? Contrary to want you might think, I don't love vignette.
Here on Upcycled by Ash, in combination with that boarder, I like it. I also like to over-saturate my images. I don't do this with all my photos everywhere, just here. I want my blog to have cohesion, so I make the photos all look like they belong together by sticking with a combination of one or more of the following vignette, saturation, and edge blur. I also crop my photos and adjust the lightness/darkness. These are all simple techniques.
 |
| Original |
 |
| Vignette and Saturate |
Most computers come with some kind of photo editing program, so do most cameras. These programs are usually more than enough to make simple adjustments to your photos. I have Photoshop, and I know how to use it. I don't though, not for my general blog pictures. My computer came with iPhoto. I hate the program in general, but it is so easy to quickly adjust my images with it that I don't bother opening Photoshop.
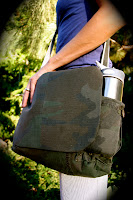
Here is the progression I followed for this photo of my Camo Bag. These are the same steps I take for the majority of the photos on this blog-
 |
| Original |
 |
| Saturate |
 |
| Edge Blur |
 |
| Vignette |
 |
| Original |
 |
| Saturate, Vignette |
 |
| Antique |
Matte-
This works best if your blog post background is white. Mine isn't so instead of blending into the post it is in this ugly square.
 |
| Matte |
Fade Color-
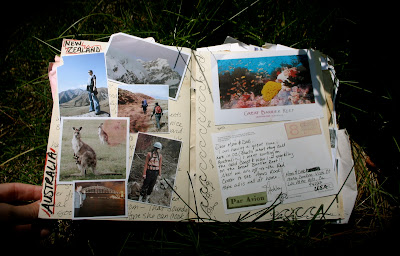
I don't use this technique on Upcycled by Ash but I've used it a lot for scrapbooking. I don't actually scrapbook but I once made a journal of my life with my husband and our travels. I literally made it, book and all. It turned out great. Fading the color of the photos made it look like the journal that we'd carried with us and filled while we were traveling. I wanted it to look old and used. (click photo to see image larger)
 |
| Faded Photos Create Effect |
Online Editing Programs-
There are quite a few of these sites that will let you do funky stuff to your photos. BeFunky.com is a free site that has some basic editing options if you don't have a program on your computer.
28 Online Photo Editing Websites- http://www.1stwebdesigner.com/resources/28-online-photo-editing-websites-to-have-fun-with/
There are a million things you can do to your photos if you want to take the time. Photoshop is an amazing program! For the most part a few simple adjustments like the ones I have shared with you here are all you need for your blog photos.
Cool tutorials on YouTube, they are for photoshop and are pretty advanced- http://www.youtube.com/watch?v=SHGElJ4L_DQ&feature=related
Yes, it requires time to take and create good photos, but it's worth it. Cool things come from having great photos on your blog. I posted the photo below in a post about Udi's Gluten Free Foods a few weeks ago. I tweeted the post and someone from Udi's saw it. They loved the photo and asked if they could post it on the Udi's facebook page. I said yes, and when the girl wrote back to say thanks, she also asked if I wanted to do a review on more Udi's products. Udi's sent me their whole line of muffins and cinnamon rolls to try! Supper yummy and all because of the photo!
 |
| My Favorite Udi's Gluten Free Bagels! Posting Great Pics -- Tutorial Part 1, Background and Setting Posting Great Pics -- Tutorial Part 2, Lighting |


i'm loving going thru the tutorials, ashley. & muffins huh!?? ;)
ReplyDelete